Cut 6 Weeks Off Your Launch: How Strategic Rapid Prototyping Services Solve 80% of Late-Stage Design Changes
Introduction
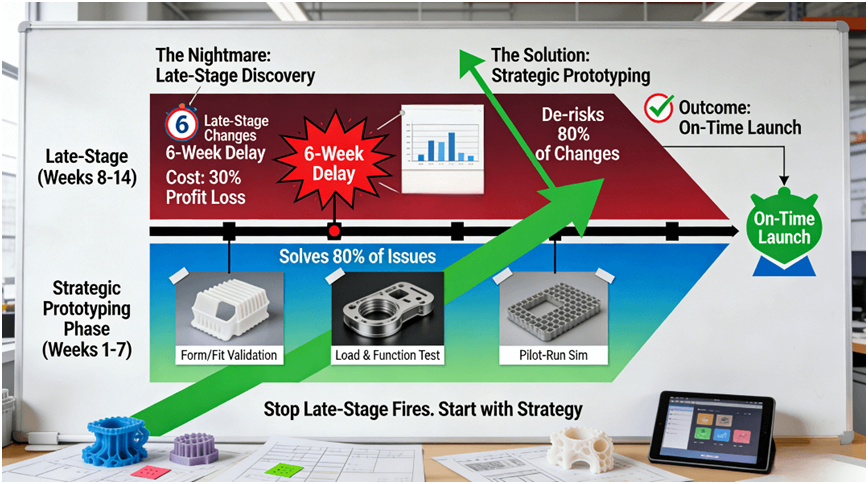
In the final sprint of product development, the most feared outcome is the discovery of a critical design flaw during functional testing or pilot production. At this late stage, even a minor change can force a mold remake or production line recalibration, delaying the project by an additional 6-8 weeks, missing a crucial market window, and consuming up to 30% of projected profits. This “late-stage change cost” is the most significant hidden killer of innovation. The root cause is that many teams view “prototyping” as an isolated, speed-focused “sample-making” task, rather than a systematic “learning investment” designed to maximize risk exposure early in the process. The frequent mismatch between the prototype and the ultimate validation goal (function, assembly, user experience) means it fails to reveal key issues ahead of time.
This article reveals how strategic rapid prototyping acts as a “pressure testing system” for the product development process. Using a framework driven by “Validation Objectives,” we will demonstrate how to plan a prototype sequence from the project’s outset. This approach leverages different technologies (3D printing, CNC machining, vacuum casting) to target and resolve specific risks, systematically addressing 80% of potential design changes early and at low cost, thereby safeguarding the project timeline and budget. Let’s first examine why traditional prototyping methods often become “false milestones” rather than true risk mitigators.
Why Does “Making a Prototype Fast” Often Fail to “Accelerate Development”?
This section analyzes the efficiency trap of traditional prototyping, arguing that the true metric for acceleration is the time to obtain a valid learning conclusion, not the time to receive the first physical model.
The “First Part Fallacy” and Its Cost
A common misconception is that a faster-printed prototype inherently speeds up development. Consider Team A, which quickly 3D prints a cosmetic model, only for it to fail functional testing due to insufficient material strength, costing two weeks. Team B invests slightly more time in a CNC-machined functional prototype that passes testing on the first attempt. The key performance indicator is not the speed of producing the first part, but the Total Time to Validated Learning. A “fast” process that yields inconclusive or misleading data ultimately slows the project. This aligns with process efficiency principles in frameworks like the APICS SCOR model, which emphasize evaluating end-to-end process reliability over individual task speed.
The Strategic Role of Prototyping in De-risking
True acceleration comes from de-risking. Each prototype should be designed to answer a specific, high-stakes question: “Will it assemble?” “Can it withstand the load?” “Is the user interface intuitive?” If a prototype is made with the wrong technology or material to answer its question, it is a wasted iteration. Strategic prototyping treats each iteration as a targeted experiment to eliminate a project risk, ensuring that speed is in service of progress, not just motion. This shifts the focus from simple fast-track prototyping to intelligent, risk-driven iteration.
Quantifying the Delay Cost of Poor Prototyping
The financial impact of a poor prototype decision is quantifiable. The 6-week delay mentioned isn’t just lost time; it’s lost market revenue, eroded competitive advantage, and inflated engineering costs. A strategic approach that prevents just one major late-stage change can pay for the entire prototyping phase many times over. To comprehensively master how to build a genuinely efficient rapid prototyping process, this in-depth guide on how rapid prototyping services work provides a detailed roadmap to avoid these pitfalls.
What Does a “Strategic” Prototype Sequence Look Like? From “Looks-Like” to “Works-Like”
This section outlines a strategic framework for planning a sequence of prototypes, where each stage uses the most appropriate technology to answer progressively more complex validation questions, systematically reducing risk.
Concept Validation: The “Looks-Like” Model
In the early concept phase, the primary risks are aesthetic, ergonomic, and spatial. The goal is to answer: “Do users like the form and feel?” Here, technologies like FDM or SLA 3D printing are ideal for creating low-cost, quick-turn appearance models. These prototypes validate the design’s intent with users and stakeholders, ensuring the fundamental concept is sound before significant engineering resources are committed. This stage is about fail-fast learning on the core product idea.
Design & Functional Validation: The “Works-Like” Model
Once the form is approved, the focus shifts to engineering. Risks now involve structural integrity, assembly fit, and basic performance. This stage demands functional prototypes that closely mimic the final part’s material properties and dimensions. CNC machining from production-grade materials (plastics like ABS or metals like aluminum) is often the best choice. These prototypes undergo rigorous testing — stress, thermal, lifecycle — to validate the engineering design. Success here ensures the product will work as intended, preventing costly changes during tooling.
Pre-Production Validation: The “Pilot-Run” Model
Before committing to high-cost mass production tooling, the final validation involves manufacturability and supply chain. Risks center on the production process itself. Technologies like vacuum casting (VCM) can create small batches of high-fidelity parts from silicone molds, simulating the look, feel, and sometimes material of injection-molded parts. This allows for final user testing, packaging verification, and even limited market launch. This phased, goal-oriented sequence is the engine for true innovation cycle time compression.
How to Decode a Rapid Prototyping Quote for True Cost Efficiency?
This section teaches how to analyze a rapid prototyping quotation for transparency and value, arguing that a detailed breakdown is essential for identifying cost drivers and comparing supplier capabilities, leading to cost-efficient innovation.
l The Anatomy of a Transparent Quote: A professional quote is a cost model, not a mystery. It should transparently itemize all components: the Design for Manufacturability (DFM) analysis fee (reflecting upfront engineering value), the per-part machining/printing cost (based on material, machine time, and technology), and all post-processing and quality inspection costs. A quote that provides only a lump sum obscures where your money is going and makes intelligent comparison and optimization impossible. Transparency is the first indicator of a supplier’s process control and commercial integrity.
l Using the Breakdown for Decision Optimization: With an itemized quote, you can engage in smart cost management. You can identify if a high cost is driven by expensive material, complex programming, or long machine time. This allows for informed trade-off discussions with your supplier. For example: “I see the cost is high due to support removal. Would a different build orientation reduce this?” This collaborative analysis, enabled by a clear quote, directly contributes to cost-efficient innovation by allowing you to control the variables that matter.
l The Quote as a Supplier Capability Indicator: The structure and detail of a quote are a proxy for the supplier’s operational maturity. A detailed, logical breakdown suggests they understand their own costs and processes deeply. Therefore, obtaining a clear, instant, and analyzable quote is the primary value of an efficient rapid prototyping online quote system, making your innovation budget predictable and manageable.
Beyond the 3D Printer: How to Match Prototype Technology to Your “Verification Goal”?
This section provides a decision matrix for aligning prototype technology with specific validation objectives, arguing that the most common source of waste is a mismatch between the question being asked and the tool used to answer it.
The Criticality of Material Properties
The choice of technology is fundamentally driven by the material properties required for the test. If the goal is to validate thermal performance or structural load, a plastic 3D-printed part is useless; you need a CNC-machined part from the correct metal or engineered thermoplastic. Conversely, testing the fit of an intricate internal assembly might be perfectly served by a high-resolution SLA print. The guiding principle must be: The prototype must simulate the critical performance characteristic under test.
Matching Fidelity to the Question
Different technologies offer different levels of fidelity. A vacuum cast part can provide near-production surface finish and color, making it ideal for marketing samples and focus groups. Metal 3D printing (SLM/DMLS) is uniquely capable of producing internal cooling channels or lattice structures impossible to machine, making it the only choice for validating those specific advanced geometries. The Society of Manufacturing Engineers (SME) resources on technology selection emphasize this need for strategic alignment between process capability and product development goals.
Avoiding the High Cost of a Mismatch
Using an SLA model for a drop test or a machined metal block for a styling review is a direct waste of time and money. Each prototype must be justified by a clear verification goal, and the technology selected must be the most cost-effective way to meet that goal with sufficient fidelity. This disciplined approach is the hallmark of true manufacturing agility in product development.
What 5 Questions Separate a True “Development Partner” from a “Parts Supplier”?
This final section provides a practical evaluation checklist to distinguish transactional parts suppliers from strategic development partners, focusing on questions that probe engineering depth, process integration, and long-term collaboration potential.
1. Probing Engineering Insight and Proactive Risk Management: Move beyond “Can you make this?” to “How would you make this better?” Ask: “Based on my design, what do you see as the top two manufacturability or performance risks, and how would your DFM report address them?” A true partner will offer specific, experience-based insights. A mere supplier will only quote the model as-is. This question tests their value as a strategic procurement advisor and their commitment to your project’s success, not just filling an order.
2. Assessing Process Continuity and Quality System Rigor: The bridge from prototype to production is where many projects fail. Ask: “How do you ensure material and process consistency when scaling from a prototype to a pilot run of 500 pieces?” Furthermore, inquire about their quality documentation: “Is the inspection data (e.g., CMM report) from the prototype phase in a format that can be used for production part approval?” A partner with certifications like IATF 16949 or ISO 13485 will have structured processes for design transfer and control, ensuring a seamless, low-risk transition.
3. Evaluating Responsiveness and System Integration: Finally, test their operational agility and partnership mindset. Ask: “What is your formal process for handling engineering change orders during the prototyping phase, and what is the typical turnaround time for a revised quote and plan?” Also, inquire about their internal systems: “How do you track and document learnings from one prototype iteration to inform the next?” A partner’s answers will reveal a culture of continuous improvement and collaboration, key for decision optimization in a fast-paced development environment.
Conclusion
In today’s competitive market, product development speed is a core advantage. Elevating rapid prototyping from a reactive “sample service” to an active strategic risk management system is the decisive key to compressing the innovation cycle and controlling development cost. By applying validation-objective-driven planning, transparent cost analysis, and selecting partners with true engineering collaboration capabilities, companies can transform the prototyping phase from a time-and-budget-consuming cost center into a high-value investment that accelerates learning and locks in success.
FAQs
Q: What’s the typical lead time difference between 3D printing and CNC machining for a functional prototype?
A: For a single, moderately complex part, industrial 3D printing (SLA/SLS) can often deliver in 2-3 business days. CNC machining typically requires 3-5 business days due to programming and setup. The choice should be driven by your validation needs (form/fit vs. strength/function) rather than speed alone, as using the wrong process can cost more time overall.
Q: How can I ensure I’m comparing “apples to apples” when getting quotes from different rapid prototyping suppliers?
A: Provide all suppliers with the exact same 3D CAD file (STEP/IGES) and specifications. Critically, compare the cost breakdown (material, machine time, setup) and the scope of what’s included (e.g., does the quote include basic finishing and a simple inspection report?). Also, assess the depth of their initial DFM feedback, as this indicates engineering value.
Q: Is rapid prototyping only suitable for plastic parts, or can it handle metals?
A: Rapid prototyping excels with both. For plastics, 3D printing and CNC machining are common. For metals, you can use metal 3D printing (for highly complex geometries) or. More commonly, CNC machining from metal stock (for superior strength, accuracy, and finish). The best process depends on your part’s function, required material properties, and geometry.
Q: How is the quality and accuracy of a rapid prototype verified?
A: Reputable providers use precision measurement equipment like Coordinate Measuring Machines (CMMs) to verify critical dimensions against your CAD model. You should receive a digital inspection report with this data. For visual prototypes, high-resolution photos are common. Always ask what inspection is included in the quote.
Q: What if I need to make a small design change after I receive the prototype?
A: Professional rapid prototyping services are built for iteration. You would submit the updated design file, and the supplier will evaluate the change’s impact on tool paths. Materials, and timing, then provide a revised quote for the new version. A streamlined engineering change order (ECO) process is a hallmark of an agile partner.
Author Bio
This article is based on deep, practical experience at the intersection of agile product development and precision manufacturing. As a certified manufacturing and rapid prototyping solutions partner (ISO 9001, IATF 16949, AS9100D). The team at LS Manufacturing is dedicated to helping innovators integrate strategic validation thinking throughout the entire development process. Upload your design concept today to receive a complimentary Risk Analysis & prototyping strategy preliminary recommendation based on your product.